
This DIY closet organizer comes in at under $200. I mean, seriously, have you ever looked at the cost of a closet organizer? My goodness! They can get quite pricey. And though I am quite fond of building out awesome organizers on the IKEA online PAX builder, I'm just not quite ready to dish out six or nine hundos on a wardrobe.
My room is quite tiny and unfortunately doubles as my office. Space is very limited. I had my dresser in the bottom of my closet previously, and it just wasn't working. It was an old dresser I got from my sister and had refinished, but the drawers were all falling out. It was also just too tall for the space it was in.
With the expensive store-bought organizers out of the question, I set off to Home Depot with my sister to see if I could build my own!
I wanted the shelving unit to fit the cube bins from IKEA, so with those dimensions in mind, I set to work. Initially, I was going to use a big 4x8 sheet of white melamine and just get it cut down to the sizes I needed, but then we found these awesome pre-measured white shelving pieces that were the proper width, and would only be about a dollar more per piece. Plus - they had a finished edge as well, so despite the little added cost, that's what we got! And our DIY closet organizer still came in well under $200.
Here's the finished product:
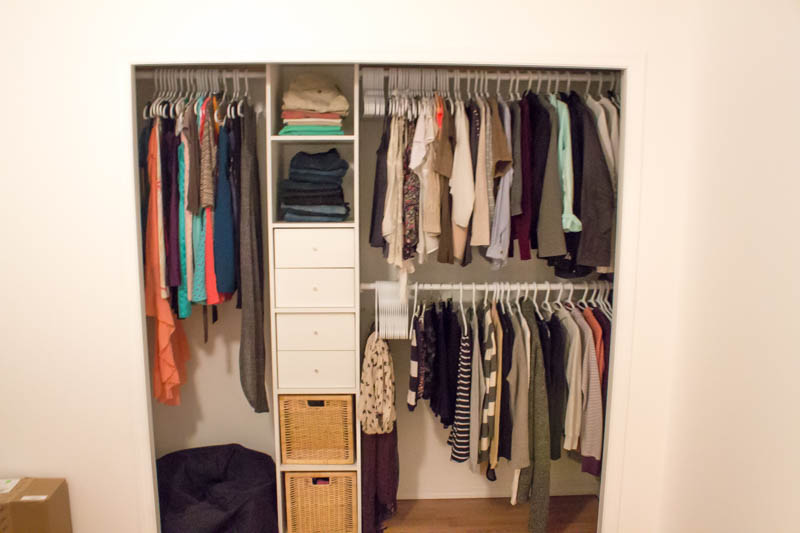
I had some drawer units on my shelves for my work space, but I wasn't happy with how my supplies were fitting, so I swapped them out and put the drawers in my closet. With my closet going quite higher than the door frame, top storage options were limited. I knew I wanted to use photo boxes, so thankfully clearance wasn't too big of a problem.

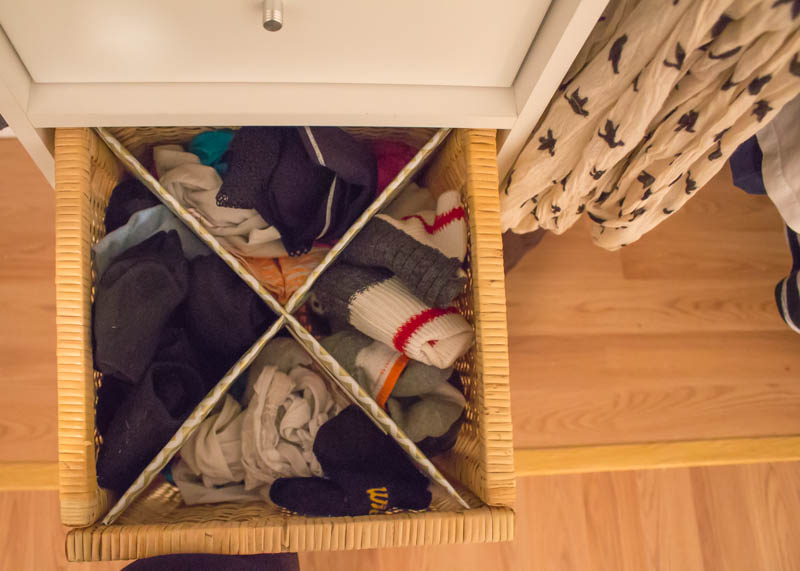
Finally, trying to maximize as much usable space as possible in the wood bins and not spend any money in the process, I created a divider out of some cardboard and just wrapped it in some nice wrapping paper I had on hand.
Cost breakdown:
Closet Organizer Unit:
2 - 30"-48" Expandable Closet Rods - $12/each
1 - 18" - 30" Expandable Closet Rod - $10
3 - 5/8" x 15 3/4" x 96" Melamine Shelving - $13/each
1 - 5/8" x 11 3/4" x 96" Melamine Shelving - $10
8 - 3/4" Furniture brace - $1/each
Accessories:
2 - BRANÄS Basket - $12.99/each
2 - KALLAX Insert with 2 drawers - $20/each
Total: $156.98
And there you have it, our very own closet organizer under $200! I'm quite proud if I do say so myself.
Note from future Bex: These costs were at the time of building this organizer. It may be more expensive now that pricing has skyrocketed.
This project was so much fun! I'm sure I could have got a wire closet organizer for about the same price, but I despise those wire shelving units. This unit is exactly what I wanted, and looks great too!